Shared channels in Teams – How can you set it up?
Since the dawn of Teams we have had individual Teams, and we have had channels. Some years ago, private channels arrived letting us create channels in Teams that could be seen only for those team members that had been given specific access to it. The drawback here was it could only be visible to existing member members and therefore somewhat limiting it’s use. That meant if you had to share the private channel with a member outside of that team, that person would need to have access to everything else in that team.
Now there’s a new guy in town, called Shared Channels. This let’s you create channels that are easily shared across own teams, but also external members can be added. You can now create a place where different teams can collaborate safely and seamlessly. And the good news here is: to access a shared channel you are not required to switch between companies in Teams! How about that? Let me now show you how to begin setting this up, as it requires some steps in the admin portal to get going.
Note: These steps here need to be done in both tenants as we have both inbound and outbound access settings both places. Please instruct any organization you need to collaborate with. Send them this article so they know how to give you access
First: Teams Admin Center
Open up Teams Admin Center (https://admin.teams.microsoft.com) and log in with a user with correct amount of rights. Typically at least «Teams Administrator».
Go to Teams Policies and from there you can either check the Global policy or create a new one. I want everyone to be able to use this feature, so I’m using the Global (Org-wide default). Make sure everything is switched to «On». Choose «Apply».
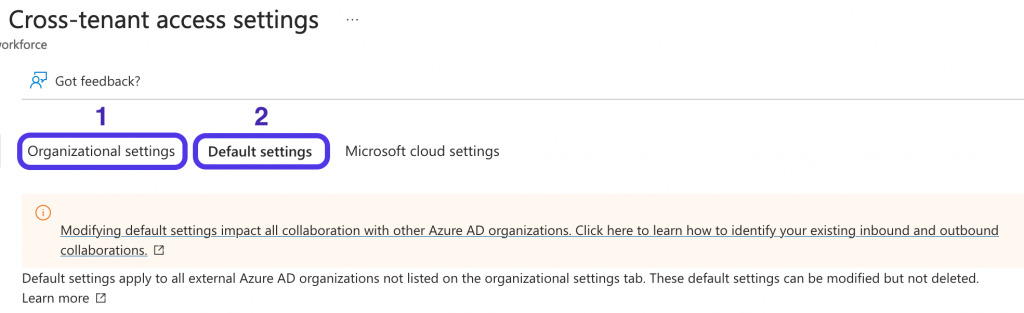
Second step: External collaboration settings in the Entra portal
Now log in to the Entra portal. Here we need to open up between tenants for cross-tenant access.
Under External Identities, choose «External collaboration settings». Then choose «Cross-tenant access settings».
We now have two choices:
- Choose individual settings for every organization we add
- Change the default settings for all external Entra ID organizations
The steps in this article will focus on option number 1, but it’s the same for option 2. The difference is where you adjust your settings. The settings are the same.
Add the other company:
First we need to add the other tenant to your tenant. This is done by clicking «Add organization» and type in either the Tenant ID or the domain name. In this example I want to collaborate with a computer repair shop called Fawlty Computers. I use their domain for adding them as a trusted organization to collaborate with. It then looks up the domain name and finds it’s Name and tenant ID for you.
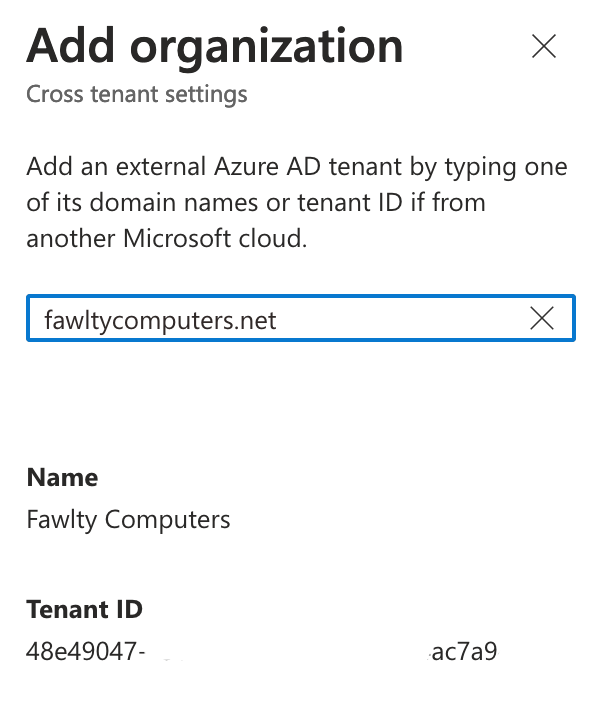
It then shows up in the list with inherited settings for access. These settings are per default blocking access so we need to adjust them for this to work.
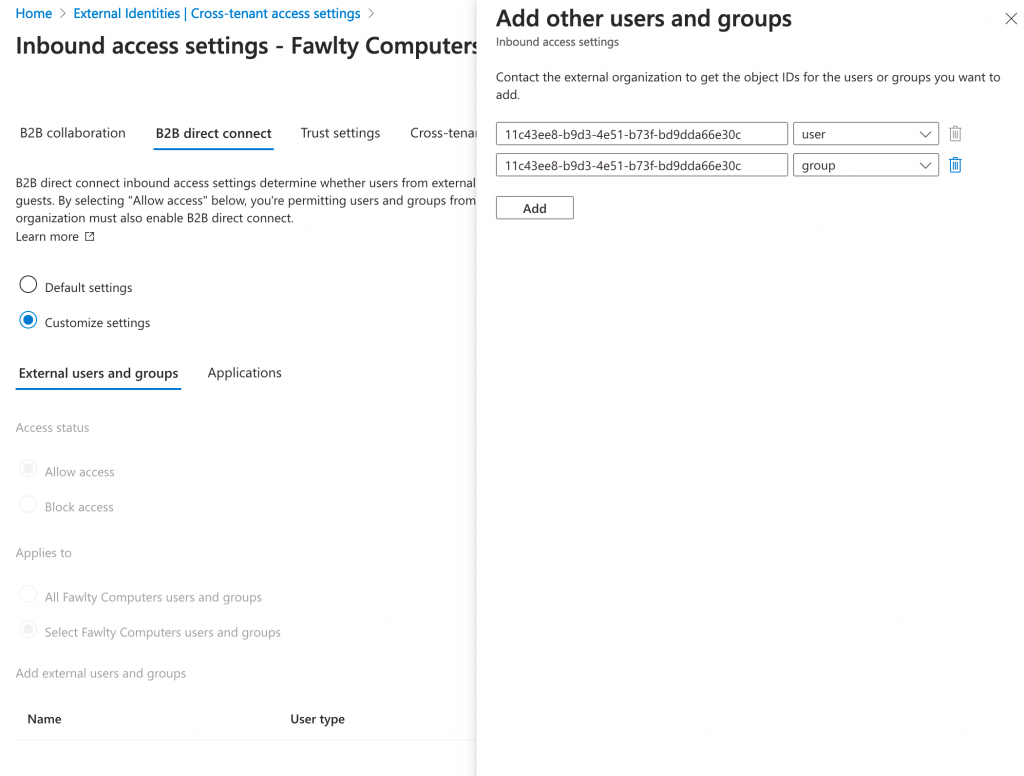
Inbound Access
Click on «Inherited from default» under «Inbound access».
Note: Do not use «Cross-tenant sync» as this does not apply to this direct connection. Any settings here will not have an effect in this scenario.
Allow access from external users and groups:
Click on the tab named «B2B direct connect» and change it from «Default settings» to «Customize settings». Under «External users and groups» the default is to allow all users from the other company to collaborate with you. Additionally, you can add just a group or even specific persons to this list by getting their object IDs (in GUID format) and adding them here:
Add application:
Next we need to define which applications the external users can have access to. This must also be set to «Allow Access». Default is «All applications» and that works just fine. But if you want greater control you can choose only what’s necessary for this scenario, and that would be the app called «Office 365». Just choose «Select applications» and click «Add Microsoft applications». Search for «Office 365» and add that. No other applications are needed to access Shared channels in Teams.
Change inbound trust settings:
The last thing we need to adjust here is under the tab «Trust settings». There are some options here:
- Trust multifactor authentications from Azure AD tenants: This allows you Conditional Access policies to trust MFA claims from external organizations for a more seamless experience
- Trust compliant devices: the same as the former, but for compliant devices
- Trust hybrid Azure AD joined devices: the same as the first, but for hybrid Azure AD joined devices
Take your pick with these settings and adjust accordingly. I’ve only enabled the first one and have not experienced any problems with that – yet!
But the next one I would recommend to enable: Automatically redeem invitations withe the tenant (tenantname). With this enabled, your users won’t have to accept the consent prompt the first time they access this tenant. This setting is relevant for cross-tenant synchronization, B2B collaboration or B2B direct connect.
Note: This setting will supress the consent message only if enabled in bot tenants!
Now click on «Save» and move on to the next part!
Outbound access
We also need to allow outbound access. Go back to «Cross-tenant access settings» and click on «Inherited from default» under «Outbound access». Repeat the steps from previous chapter as they are identical except for users and groups.
Just remember this part is outbound – which users or groups in YOUR organization have access to the external tenant.
Removing an organization
Want to get rid of an organization? Locate it in the same place where you added it. To the right on the same line there is a icon of atrash can. Click it. Press «OK» if you really want to remove it and you’re done.
What’s next?
When you are done with this, and the other tenant has done the same you should be able to use shared channels in Teams. Please give it a try!
For instructions on how you use shared channels, go to my other blog (mostly Norwegian) specifically aimed for Teams, user adoption and collaboration here: https://tonyteams.no